Meeting Minutes Quick Reference Guide
This topic provides a reference for the Meeting Minutes activity center.
Click here to download a PDF of the reference guide.
Purpose
Use the Meeting Minutes activity center to streamline the management of agendas, minutes, and commitments associated with project meetings. The Meeting Minutes activity center synchronizes with Microsoft Outlook to ensure that meeting commitments don’t slip through the cracks.
Audience
Internal project team members. External project team members can view meeting minutes from the Info Exchange website (based on permissions).
Tasks covered
● Create a meeting in Project Center
● Create a meeting from Outlook
● View the meeting minutes form and send meeting agenda/minutes
● View meeting minutes on Info Exchange
To create a meeting in Project Center
1. In the
Meeting Minutes activity center,
select Add from the Tasks panel
and select the type of meeting you want to create.

2. In the
Create
Meeting dialog box enter a Title for the meeting, indicate
the Start Date and time, End Date and time, add Team
Members invited to the meeting, and other information as needed.
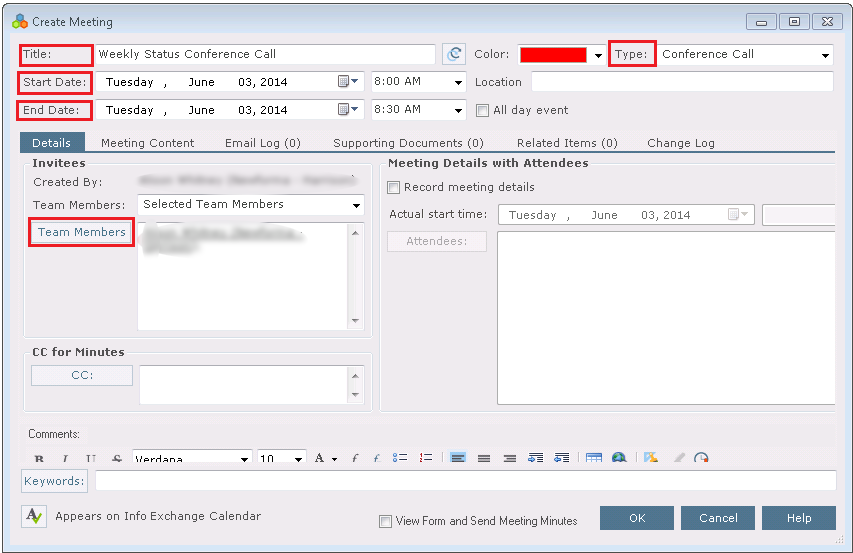
The Type field defaults in with the type you chose when you created the meeting, but it can be changed if needed.
3. If you
want to make it a recurring meeting, click the Recurring
button and choose the recurrence details in the Calendar
Item Recurrence dialog box.

4. Click OK to save.
To create a meeting from Outlook
Another way to create a Newforma Meeting is from your Outlook calendar.
1. Add the
meeting as usual from your Outlook calendar. Invite attendees and fill
in other information as needed. Instead of clicking the usual Send
button, click the Send and Create Newforma Meeting button. This
will send the invite and create a Newforma meeting at the same time.

2. In the
Select Project
dialog box, select the project where you want to create the meeting
and click OK.

3. In the Create Meeting dialog box, fill in the rest of the meeting information as needed and click OK.
Information created in Outlook will appear as read-only in the Newforma meeting.
To set the meeting agenda
Once you have created a meeting, the next step is to set the agenda.
1. Click on the Meeting Content tab and check the box to Set the Agenda for the Event.
If the meeting is not open, select it in the Meeting Minutes activity center and select Modify from the Tasks panel.

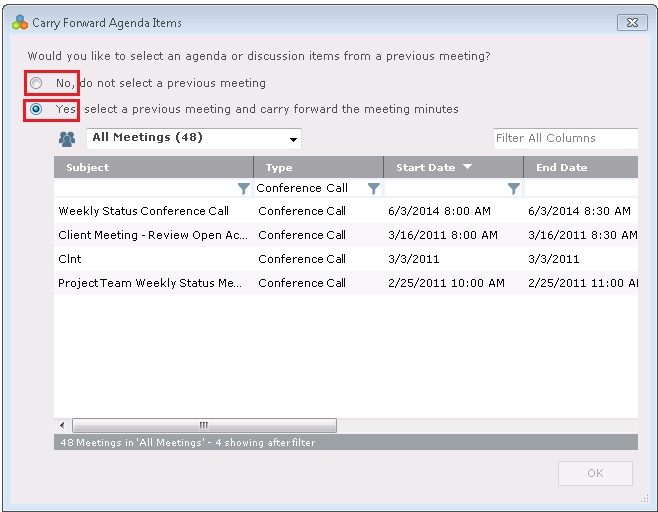
2. In the
Carry Forward
Agenda Items dialog box, choose Yes to copy the agenda and
discussion items from a prior meeting, or No to create your own
agenda either by typing it or copying and pasting from a Word document.
3. Use the
formatting tools if needed to format text. Click the button in the upper
right-hand corner of the tab to expand the panel for more editing room.

4. Click
in the Discussion Items area.
If you copy the agenda from a prior meeting, any discussion items are
also copied. Edit as needed. You can also add or remove items such as
action items and RFIs using Copy items from another Meeting, Identify
New Action Items, Remove items, etc. Double-click items to
update details if needed, or add supporting documents.

To view the meeting minutes form and send meeting agenda/minutes
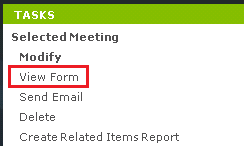
1. If you
are ready to send the meeting agenda to invitees, select the meeting in
the Meeting Minutes activity center
and select View Form from the Tasks
panel. Alternately, you can perform this step by modifying the meeting
and checking the View Form and Send Meeting
Minutes box at the bottom of the Modify
Meeting dialog box.
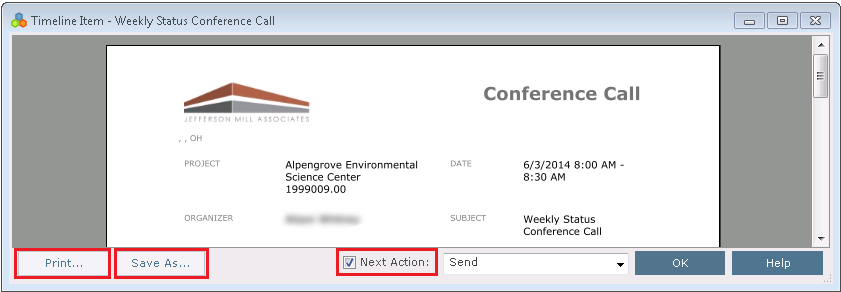
2. The resulting
merged Meeting Agenda/Minutes document appears. You can Print,
or use the Save As button to save the file. If you are ready to
send the meeting notice, check the Next Action button and choose
Send, then click OK. This
creates a PDF of the meeting notice and attaches it to the sent item.
3. The Send Options dialog
box appears. You can send the document via Info Exchange or email.
Select the send method and click OK.

4. Select the files to send in the Select Files to Send dialog box and and click OK. If Info Exchange was chosen as the send method, the Transfer Files to a Newforma Info Exchange Server dialog box appears with the meeting notice attached. Select the recipients, fill out any remarks and other information as needed, and click Transfer. Complete the Transfer to Info Exchange Options dialog box as needed and click OK.
To add minutes
During a meeting or after it is done you can update the Meeting with the minutes.
1. Select
the meeting in the Meeting Minutes
activity center and select Modify
from the Tasks panel. Select the
Record Meeting Details checkbox
in the Meeting Detail with Attendees section
of the Details tab.
Modify the actual start time and actual attendees if needed.

2. Select
the Meeting Content tab and update,
add or remove any discussion items. Enter minutes in the Meeting
Notes section.

3. When the meeting is over and all discussion items and meeting notes are finalized, you can use the View Form task once more to send the updated meeting minutes to all attendees.
To view meeting minutes on Info Exchange
Both internal and external project team members can view meetings from the Info Exchange website (with the proper settings and permissions – check with your project or global administrator).
1. Log into the Info Exchange website
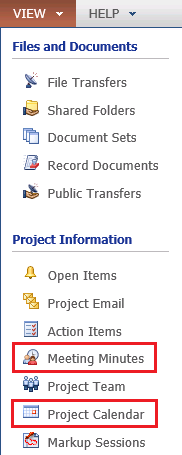
and select the project. Select View
> Project Information > Daily Reports.
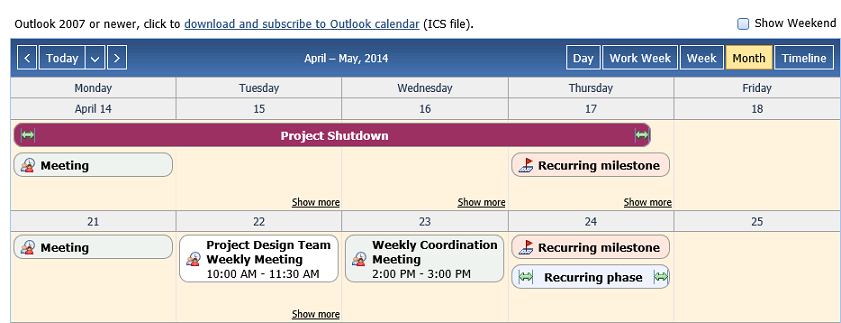
Meetings can also be seen on the Project Calendar.
2. In the
Meeting
Minutes log, click on the Subject of a meeting to view
the Meeting
Minutes form. Click the Print
button to print.

3. After
clicking View > Project Calendar, select the type of view you
want (Day, Week, Month, etc.). Double-click on a meeting to see the Meeting Minutes form.
Key features
● View, add, track, and manage project meetings, agendas, discussion topics, and events.
● Keep project teams focused on their highest priorities by efficiently tracking and communicating discussion items and commitments.
● Create meetings in Microsoft Outlook and file them in a project using the Project Center Add-in for Microsoft Outlook.
● Add open action items, RFI’s, supporting documents, and other project items as discussion items for a meeting.
● Carry open discussion items across a series of meetings until they are resolved.
Table of Contents
Index
Search (English only)
Back


