

Log a Daily Report
This topic explains how to log a new daily report in Project Center. It also explains how to finalize a daily report.
To log a new daily report in Project Center
|
1. |
If you are not already there, open the Daily Reports activity center by clicking Daily Reports from the Activities list or the Project Home activity center. |
|
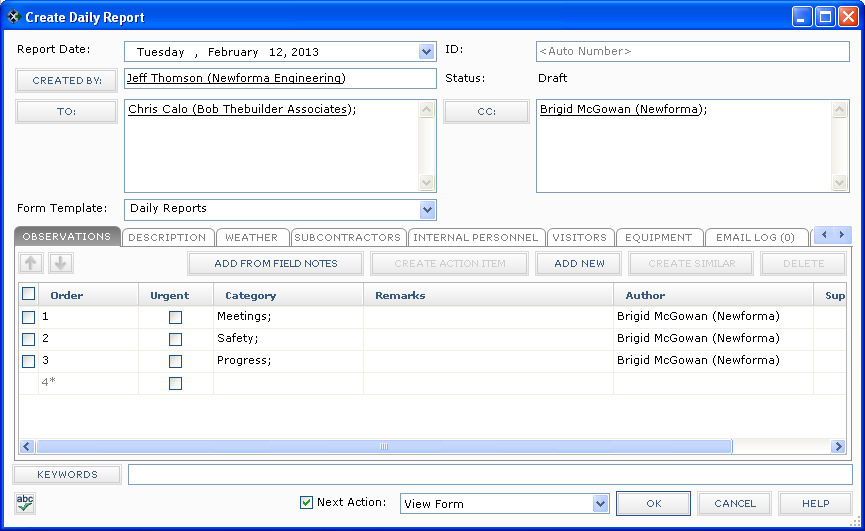
2. |
From the Tasks panel, click Create Daily Report to open the Create Daily Report dialog box, as shown here:
|
|
3. |
Select the report's date from the Report Date drop-down calendar for a date other than today. (Today's date is the default.) |
|
4. |
Select the report's creator by clicking Created By to open the Choose a Project Team Member dialog box (the current user is the default).. |
|
5. |
Click the To button to open the Choose a Project Team Member dialog box to select the report recipients. |
|
6. |
To log your observations, click the Observations tab. 1 See the Daily Reports activity center topic for information about each column in each of the tabs. ● Click Add From Field Notes to open the Choose Field Note dialog box to select field notes to add as observations. ● Click Add New to add a new observation row and then fill in the information. ● To create a similar observation without having to re-enter all the information, select the checkbox to the left of the observation and click Create Similar to add a new row containing the same information as the selected one. ● To delete an observation, mark the checkbox to the left of the observation and click Delete. |
|
7. |
Enter the purpose of the daily report, any general project observations, and any other comments on the Description tab. |
|
8. |
Enter the weather conditions for the day on the Weather tab. ● Click Add New to add a new row and then fill in the information. ● Click Create Similar to add an observation similar to the one selected without having to re-enter all the information. A new row containing the same information as the one selected is added. ● Click Delete to delete the selected row. |
|
9. |
Use the Subcontractors tab to track the subcontractors at the site on this day. ● Click Add New to add a new subcontractor row and then fill in the information. ● Click Create Similar to add a subcontractor similar to the one selected without having to re-enter all the information. A new row containing the same information as the one selected is added. ● Click Delete to delete the selected subcontractor. |
|
10. |
Use the Internal Personnel tab to track the internal personnel at the site on this day. ● Click Add New to add a new contact row and then fill in the information. ● Click Create Similar to add a contact similar to the one selected without having to re-enter all the information. A new row containing the same information as the one selected is added. ● Click Delete to delete the selected contact. |
|
11. |
Use the Visitors tab to track the visitors at the site on this day. ● Click Add New to add a new visitor row and then fill in the information. ● Click Create Similar to add a visitor similar to the one selected without having to re-enter all the information. A new row containing the same information as the one selected is added. ● Click Delete to delete the selected visitor . |
|
12. |
Use the Equipment tab to track the equipment at the site on this day. ● Click Add New to add a new equipment row and then fill in the information. ● Click Create Similar to add an equipment row similar to the one selected without having to re-enter all the information. A new row containing the same information as the one selected is added. ● Click Delete to delete the selected equipment row . |
|
13. |
If you want to attach files to the daily report, click the Supporting Documents tab, then click Add Files > Another Project File to open the Add Supporting Documents dialog box to locate the files. Click Open to add the files. |
|
14. |
The Email Log tab lists all email messages associated with the daily report. When a user clicks File as or File in Project (then chooses the daily reports option) from the Project Center Add-in for Microsoft Outlook Ribbon Bar, the email message appears here. You can also add email messages by clicking Add or dragging and dropping from Microsoft Outlook. |
|
15. |
Click the Related Items tab to relate (link) this daily report to another Project Center item. |
|
16. |
Click OK when finished to create the daily report and log it in the Daily Reports activity center. |
To finalize a daily report
|
1. |
If you want to finalize the daily report, mark the Next Action checkbox and select Finalize from the drop-down list. Doing so does the following: ● Changes the Status to Final. ● Creates a PDF file with the format Daily Report_Report Date_Report#_Rev#.pdf and saves it in the record copy folder set in the Edit Project Settings dialog box. For example: Daily Report_20130305_00156_R1.pdf ● Sets the daily report to read-only with the exception of the Supporting Documents/Email Log/Related Items/Change Log tabs. If you want to revert the report back to a draft, mark the Next Action checkbox and select Revert to Draft from the drop-down list. Doing so does the following: ● Changes the Status to Draft. ● Sets the daily report to fully editable. ● When the report is finalized again, a new PDF file is created with a Rev# of +1. |
|
2. |
Click OK when finished to create the daily report and log it in the Daily Reports activity center. |