Set Up a Project to Use the Newforma Model Viewer
Use the following guidelines to set up projects so that internal and external Project Center users can use the Newforma Model Viewer Powered by VEO to view models or linked views from project items in Project Center and Info Exchange.
You must be a Project Center administrator to perform this procedure.
Initial configuration
To expose the Spatial Index, Model Views, Building Elements and Newforma Model Viewer activity centers in Project Center
|
1. |
If you are not already there, open the Project Center Administration activity center (shown below) by clicking Project Center Administration from the Tasks panel of the My Project Center activity center, or from the Activities list. |
|
2. |
Click the Projects tab. |
|
3. |
Select the project you want to configure from the list, then click Edit Settings from the Tasks panel to open the Edit Project Settings dialog box. |
|
4. |
Click the Activities tab. |
|
5. |
Move Spatial Index, Model Views, Building Models and Elements and Newforma Model Viewer to the Activities column (if they are not already there), as shown here, which will make the Spatial Index activity center, the Model Views activity center, Building Models and Elements activity center and the Newforma Model Viewer available in the project.
|
|
6. |
Click OK to save the changes. |
|
7. |
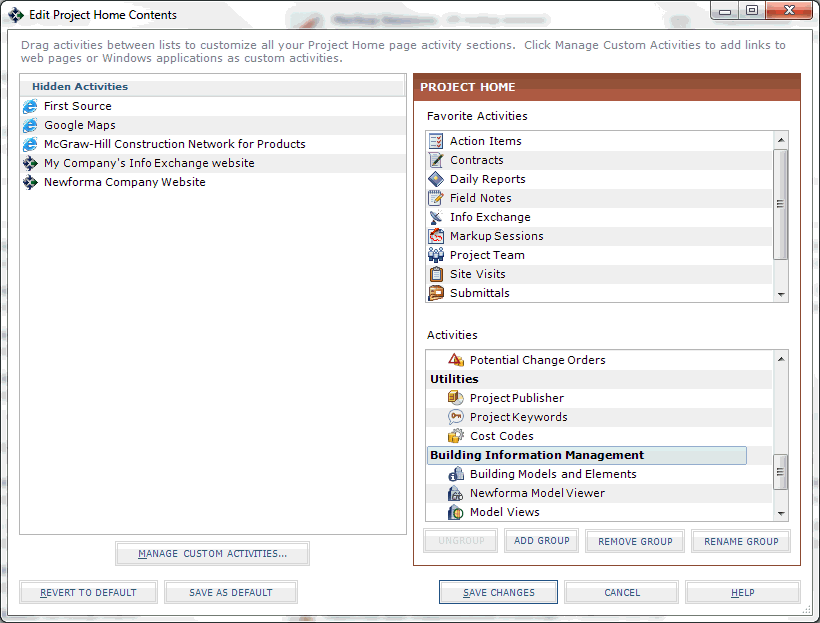
Click
● If they are in the Hidden Activities column, move them to one of the Activities columns. ● Place them in the locations in which you want them to appear in the Project Home activity center and the Activities list.
|
|
8. |
Apply the customized Project Home activity center and Activities list to all users. See the To apply the customized Project Home activity center to all users section of the Customize the Project Home Activity Center and Apply It to All Users topic for information on how to do this. |
|
9. |
Click Save Changes. |
|
10. |
Continue with the sections below. |

Info Exchange configuration
Use the following procedures to make a Project Center project available on Info Exchange, select the activity centers to display, and give users access to the project.
To expose the spatial index and model views activity centers on Info Exchange
You must be a Project Center administrator to perform this procedure.
|
1. |
If you are not already there, open the Project Center Administration activity center by clicking Project Center Administration from the Tasks panel of the My Project Center activity center, or from the Activities list. |
|
2. |
Click the Projects tab. |
|
3. |
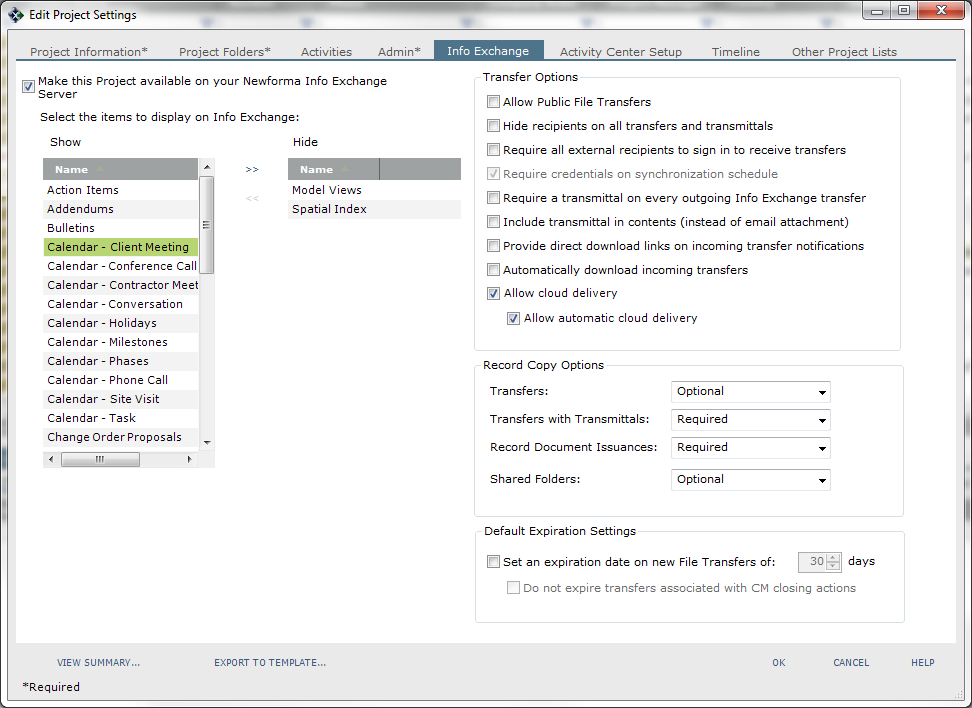
Select the project you want to put on Info Exchange, then click Edit Settings from the Tasks panel to open the Edit Project Settings dialog box, as shown below. |
|
4. |
Click the Info Exchange tab. |
|
5. |
Mark the Make This Project Available on Your Newforma Info Exchange Server checkbox (if it is not already selected) to put the project on Info Exchange, as shown below. |
|
6. |
Move Model Views and Spatial Index to the Show field to display them on Info Exchange. The Building Models and Elements activity center is not available on Info Exchange.
|
|
7. |
Click OK to save the changes. |
To set user permissions to allow external users to view Spatial Index and Model Views activity centers on Info Exchange
Perform the following steps to allow external users to view the Spatial Index and Model Views activity centers on Info Exchange.
Internal users have permission to view these activity centers by default.
|
1. |
If you are not already there, open the Project Center Administration activity center (shown below) by clicking Project Center Administration from the Tasks panel of the My Project Center activity center, or from the Activities list. |
|
2. |
Click the Permission Sets tab. |
|
3. |
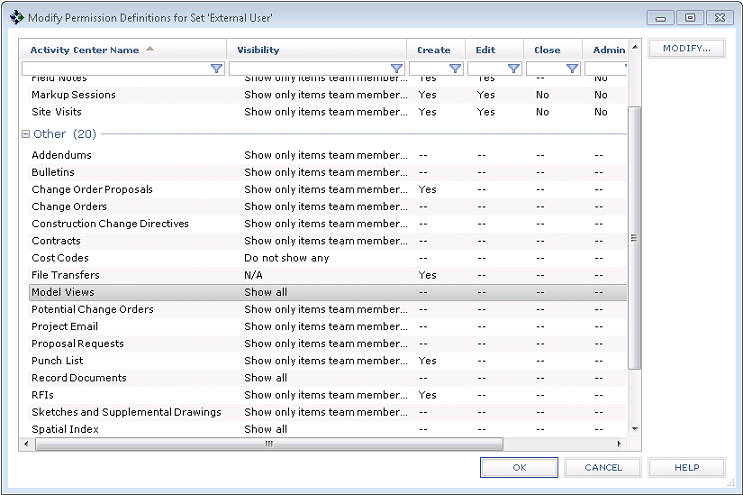
The Permission Sets for Project Center Activities list contains all of the available permission sets. Select External User in the Name column and click Modify to open the Modify Permission Definitions for Set dialog box, shown here:
|
|
4. |
Double-click in the Visibility column for Model Views and select Show All in the Modify Permission Definition dialog box. Click OK to save changes. |
|
5. |
Double-click in the Visibility column for Spatial Index and select Show All in the Modify Permission Definition dialog box. Click OK to save changes. |
|
6. |
Click OK in the Modify Permissions Definitions for Set dialog box. |
To give yourself or other users access to the project on Info Exchange
|
1. |
In Project Center, open the project that you want to give users access to. |
|
2. |
Select Project Team from the Activities list to open the Project Team activity center. |
|
3. |
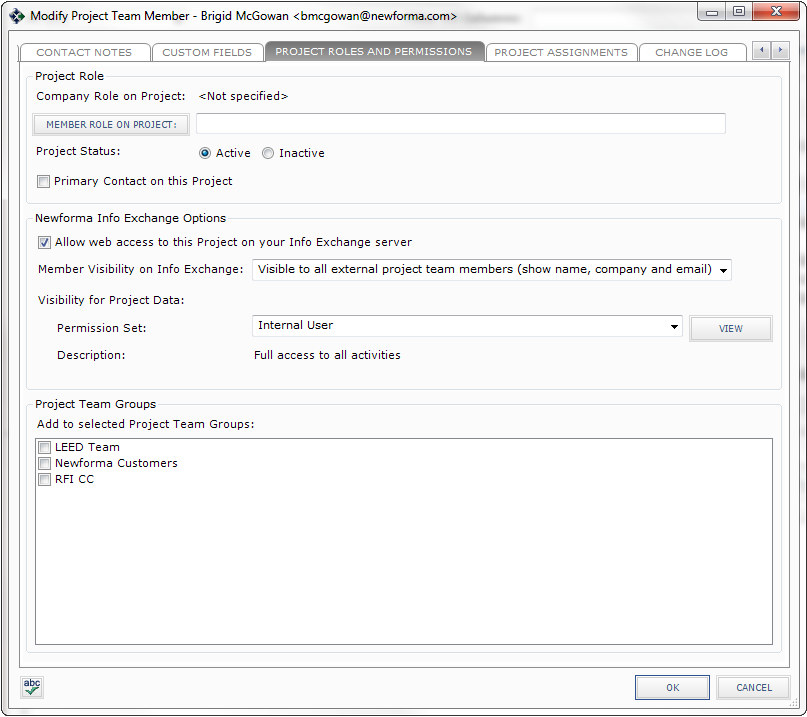
Double-click the user who you want to be able to access the project on Info Exchange. The Modify Project Team Member dialog box opens, as shown below. |
|
4. |
Click the Project Roles and Permissions tab. |
|
5. |
In the Newforma Info Exchange Options section, mark the Allow Web Access to This Project on Your Info Exchange Server checkbox (if it is not already selected) to give the user access to the project on Info Exchange as shown here.
|
|
6. |
Select the permission set to apply to the user from the Permission Set drop-down list. |
|
7. |
Click OK to save the changes. |