Project Email Activity Center
Use this activity center to view and manage your project email. This activity center displays all Outlook items (files with an extension of .MSG) and .EML files that have been filed to the current project. From this activity center, you can view project email messages, link email messages to a project item, and publish email messages. You can also search project email message files.
To file Microsoft Outlook items to a Project Center project
From Microsoft Outlook, select the item you want to file to a Project
Center project, then click File in
Project from the Project
Center Add-in for Microsoft Outlook Toolbar to open the File
in Project dialog box. You can file email messages, meeting requests,
calendar items, and posts using the File
in Project dialog box. You can also file them directly to a Project
Center item by clicking File As,
then selecting the item type from the drop-down list. Refer to Welcome
to the Project Center Add-in for Microsoft Outlook (accessed by clicking
the ![]() icon in the Project Center Add-in
for Microsoft Outlook Toolbar) and File
Email Items Automatically Using the Project Center Add-in for Microsoft
Outlook for more information.
icon in the Project Center Add-in
for Microsoft Outlook Toolbar) and File
Email Items Automatically Using the Project Center Add-in for Microsoft
Outlook for more information.
1 If two users save the same email into two different folders within the same project, Project Center will create an exact copy of the email in both folders. If the two folders are merged after the fact, Windows Explorer will provide the standard overwrite message. If multiple users save the same message to the same folder, Project Center will create only one copy.
To file email items from other email clients to a Project Center project
From your email client, select the email messages you want to file to a Project Center project, then drag and drop them into the appropriate project folder under the Newforma - Items to File Folder. If Automated File Items Enabled is activated in the Project Center Administration Activity Center Servers tab, they will be automatically filed at the designated time. If you want to file them immediately, click File from Items to File Folders in the Tasks panel of this activity center.
|
● File from Items to File Folders Click to immediately file any email messages that are in your email application's Newforma - Items to File Folder to Project Center. The project folders under the Newforma - Items to File Folder in your email application are also updated. The Newforma Project Center Filing Details dialog box will open when the process is complete. See File Email Items Automatically Using the Project Center Add-in for Microsoft Outlook for related information. ● View Recently Filed Click to list the email messages that were filed in the last seven days. The Filed column lists the filing dates. ● Clear Recently Filed Click to clear the Filed filter and return to the full email log. Selected EmailRefer to the Email Tasks panel topic for information on the tasks. The following additional tasks are available in this activity center that are not available in the Email Tasks panel when it is accessed from other activity centers: ● View Conversation Click to view an email conversation thread. Clicking this task clears any previous filters and puts the subject of the selected email message into the Subject column filter field. Before doing that, it removes any RE:, FW:, or Fwd: in front of the subject, as well as any Project Center tags at the end of the message so that only email messages with the same subject are displayed in the list. It automatically sorts the messages by the time in the Sent column. 1 If the subject of the email message is test, any email messages with the word test as part of the subject will be listed. For example, email messages with the subjects of test, tester, retest, test1234, etc. would all be listed as part of the thread. When you are finished using this task, you can click Clear Conversation to display all messages again. ● Clear Conversation Click to clear the Subject filter and return to the full email log. ● Explorer Tasks > Copy Click to open the Select Destination Folder dialog box to copy the email file to the clipboard, which you can paste to another location in the Windows file system. ● Explorer Tasks > Move Click to open the Move to dialog box to move the email file to another location in the Windows file system. ● Explorer Tasks > Delete Click to permanently delete the email file from the Windows file system. ● Create a Report Click to open the Create Report dialog box to select the type of project email report to create. The report contains the contents of the selected email messages. 1 You can customize which columns appear in reports simply by selecting which columns to show and hide in the activity center. Simply right-click on column headers to add or remove columns. A checkmark indicates the column will appear in the activity center and the report.
|
Project EmailAll email messages filed to this project appear in this activity center. When the email message files are filed to the project, they are saved in the default email folder set in the Edit Project Settings dialog box. Filter drop-down list
You can filter the list of messages to show only the most recent one thousand messages. The number of messages in the All Messages category is indicated in parentheses next to the filter name.
Filter All ColumnsYou can filter by any text that appears in any of the columns. For example, if you know the subject (or part of the subject) of the email message you are searching for (or the from or to contact, etc.), enter at least part of the text in this field. The list of messages updates automatically as you type. For example, if the email message you are searching for has the number 30 somewhere in one of the columns, enter 30 in this field. The list will be narrowed down to only email messages that have the number 30 somewhere in one of the columns. It does not filter text in the body of email messages. Filter All Columns does not search email messages or files.
Click to toggle between showing and hiding the column filter fields. ClearClick to clear all filters. Group byClick to group by the any of the columns. For example, if you want to group the list of email messages by subject, select Subject from the drop-down list. The email messages will be grouped into separate sections alphabetically by subject. See Column Sorting, Filtering, and Grouping for more information. Column filtersYou can also filter by any text that appears in the columns circled below. For example, if you know the subject (or part of the subject) of the email message that you are searching for, enter at least part of the text in the Subject field. The list of messages updates automatically as you type. Enter text in the fields pointed out below to filter by those columns.
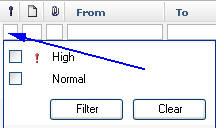
1 If you sort by Subject, any RE: and FW: text strings that precede the message subject are ignored, which allows email replies and forwards to be sorted with the original messages. Click the area indicated below to filter by importance:
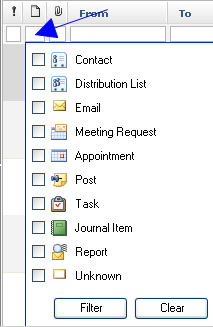
Click the area indicated below to open the drop-down list to filter by item type. Mark the checkboxes of the types of items you want to display. The other item types will be removed from the list until the checkboxes are cleared.
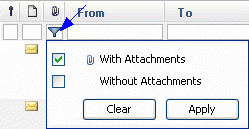
Click the area indicated below and mark the With Attachments checkbox to display only email messages with attachments, or Without Attachments to display only email messages without attachments. You can also filter by attachment name by entering text in the Attachments column filter, as indicated above.
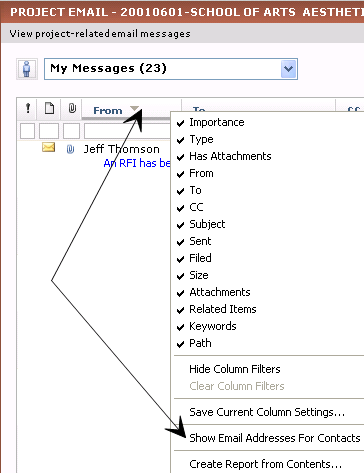
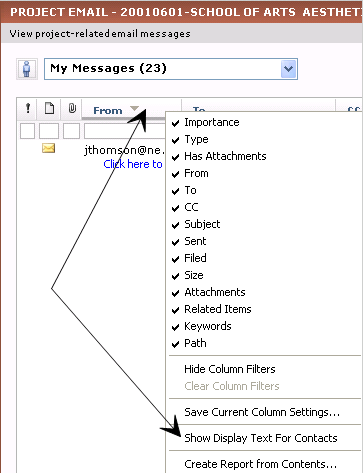
You can toggle between displaying contact names and email addresses by right-clicking on the column headers and choosing which to display, as shown here (the new choice will appear when you make the switch):
Email messages listThe email messages list (on the left side) lists all email message files for this project. You can filter the list by any column, as explained above. Dragging and dropping email mesasgesMicrosoft Outlook users can drag and drop email messages from Outlook into this section. Novell GroupWise users must click Tools > Options to open the Options dialog box, then double-click Environment to open the Environment dialog box, then click the Default Actions tab, then choose the Create a Copy (.EML) option under Drag Message to Desktop to enable dragging and dropping into Project Center.
ColumnsFromThe sender of the email message. ToThe recipients of the email message. CCRecipients CC'd on the email message. SubjectThe subject of the email message. SentThe date the email message was sent. FiledThe date the email message was filed to this Project Center project. 1 If the project was upgraded from Sixth Edition, the date will be listed as Unknown. SizeThe size of the email message in KB. AttachmentsThe names of the attachments included with the email message. Related ItemsIf the email message has any related items, the icons appear here. KeywordsAny user-defined categories assigned to the email message in Microsoft Outlook. PathThe full path to the location the of the email message file. FolderThe folder in which the email message file resides.
Preview tabThe preview section (on the right side by default) displays the selected email message. HTML and embedded images are supported. Any attachments included with the email are also listed here. You can double-click them to open them without opening them in Outlook. Click the
Related Items tabThis tab lists all related Project Center items for the selected email message. |
To access this activity center
Click Project Email from the Activities list or from the Project Home activity center.


 Select to show email messages
for all users.
 Select to show only email messages
on which you are the

 and
and  buttons to switch between viewing messages in HTML
and plain text. That button that appears indicates which format
is being used.